The Legacy and History of the Model
Article by Mark S. Gustavson, Photos by Mike Barlow
Complete restoration photos at the end of this article.
In the history of our hobby, there are a few models which stand out as examples of advanced craftsmanship. Though the achievement of each scale vehicle was surpassed by later models, the importance of those models can never be understated. One mark of their greatness was that they served to teach advanced techniques to modelers everywhere. In sum, such models are epochal by virtue of the effect they’ve had upon the hobby.
Once such model is certainly the Car Model Magazine Crusader. First appearing in the September 1963 issue of CM, the model set an entirely new standard of model customizing, detailing and interior construction that still reverberates today. The model spawned several later interpretations, and was often emulated in the First and Second Revell-Pactra model car contests (1963-64) and in the 1965 Revell-Testors Contract. Though Oscar Koveleski is reluctant to say who actually built the Crusader, strong circumstantial evidence strongly suggests that the model either came from his desk or from the work bench of R.A. “Smitty” Smith. However, consider the information accompanying the discussion of the coverage in the October 1963 issue of Car Model magazine.
The chassis work alone set a new criterion for detailing. When most builders were simply detail painting the standard one piece AMT floorboard/frame once common, the builder removed the entire floorboard and cleaned up the frame rails. Before painting, the builder wired the model with a relatively complete fuel system and electrical/spark plug system with real wire when most builders, when they tried at all, were using thread.
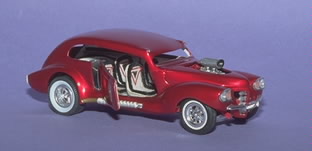
The body exhibited a similar amount of work. The builder sectioned the body, chopped the top and leaned it forward on wedge-cut “A” pillars, molded the fenders to the body, installed quad headlights, hinged the doors, and invented a “double-knuckle” rear hatch door that still operates in its original configuration. Molded-in running boards were created, twin roof antenna tunnels were fashioned, and a hole was cut in the hood to permit the engine supercharger to protrude. On top of all of that, an incredible candy red lacquer was applied (using then-available Schwinn bicycle paint).
The top all of that off, the interior was worked over too. The custom dash board (which still sports its original candy red paint) was the feature of an entire article as were other aspects of the model 1. The seats were upholstered with the thin white pearl textured vinyl that was once marketed in the Ulrich Custom Upholstery kit, thin black chenille, red pinstripping tape, and black vinyl.
Despite all of the importance and notoriety that the Crusader experienced, it fell victim to neglect, a halfhearted restoration attempt that almost destroyed the model, and an uncounted number of anonymous owners.
Sometime in 1988, I got a call from Dennis Doty whom, aware of my then-nascent intent to create a national model car museum, asked me if I would be interested in receiving the Crusader. At first, I thought Dennis was just joking (as he often does with me). However, the serious tone of his voice suggested that this offer was for real. Apparently, Dennis had received the model from Ric Burk (now deceased) who acquired it either from R.N. MacLeod (one of the founding partners of the magazine) or Tonto, the new publisher who purchased the magazine and then attempted to revive the publication to no avail from September 1973 through the July 1974 issue (MacLeod has previously moved the headquarters to Arizona, but ceased publishing with the April 1973 issue). No records exist of this model’s long sojourn from the original offices in Pennsylvania to Arizona, but it was clear that it had been badly mistreated (though the vast majority of the original parts still accompanied the model).
Dennis wanted me to restore the model, then place it in the Museum once it opened. Though he warned me of the appalling condition of the model, nothing could have prepared me for the actual condition of the Crusader. The beautiful body had cracked or been broken into three major pieces: The front clip was separated from the body at the cowl and the rear body and fender assembly had been severed from the roof right above the midpoint of the rear quarter window. To add insult to injury, a thick coat of flat black primer covered the lovely original lacquer on every part of the body except the driver’s door: That bit of original paint was carefully hand polished and used as a sample for the new paint job. In sum, the model was a mess. The first task at hand was to restore the frame which, among all of the parts and components, was in the best shape. Still, one of the rear slicks and front tires were missing, as were other miscellaneous parts. I turned to the ever-helpful Utah Model Car Association member Ed Wright who possesses probably the most remarkable collection of vintage parts anywhere on the planet. Ed graciously agreed to accept the chassis and supply the precious parts. Ed also handled the formidable task of cleaning the chassis of nearly 30 years of accumulated grime, dust and other debris. After a few months of work, Ed delivered the reassembled frame — this time with all the correct wheels and tires — back to me.
At that point, I had a stable reference point to use as in reassembling and refinishing the body . There was so much body damage that I had to make constant reference to the September 1963 issue of Car Model Magazine to assist me. The major body components were brass -pinned back together after which I decided to hammer .010 brass reinforcing panels which were, in turned, epoxied to the underside of the panels to strengthen the joint. Some actual reconstruction was necessary, especially on the driver’s side because of some substantial damage there. With the body now pinned and epoxied back together, I was faced with the task of stripping off the awful black primer. I was hesitant about using commercial paint stripper because of the aggressiveness of those chemicals. I didn’t want to immerse the body in any solvent (like brake fluid) because of the delicacy of the original AMT putty and the balsawood running boards. Therefore, I was faced with just one option: Sanding it off. Out came the 400 grit 3-M sandpaper followed by more than 10 hours of laborious wet sanding. The black primer was quiet thick but it was entirely removed through sanding, revealing much of the original candy red lacquer and gold under base.
At this point, I ground out the damaged areas with a Dremel, beveled those areas, and applied Evercoat catalyzed polyester putty to the damaged areas. Lots of sanding preceded a heavy coat of Dupont acrylic lacquer primer. While the primer was drying, I decided to duplicate the original color as closely as possible. One of the doors had not been covered with that thick black paint; it still displayed the original candy lacquer which was carefully polished to bring back the color. At that point, it was delivered to Byron Bowman, proprietor of Salt Lake’s Superior Automotive Supply, who supplied the correct toner for the candy red paint. I decided to experiment with several different color coat scenarios to replicate the original color: After a lot of experimentation, I used a lot of LMG’s pearl gold powder mixed in clear lacquer for a base and used just a bit of their red pearl mixed with the Dupont candy red toner to replicate the finish. Because Metalflake-brand lacquer clear is the best there is, it was selected.
At this point, work stopped. I was busy at the office and the Oakland Roadster Show Diorama was consuming a lot of my time. After GSL-XIII, though, I laid on the base and color coats on the model (after a LOT of sanding with 600 grit paper and reprimering), followed by four coats of the clear lacquer. All of the parts were painted at the same time to insure uniformity. At this stage, I set the model aside for six months with the chassis and interior parts protected from the dust in my workroom. At the end of that period, I inspected the body carefully and found no flaws in the body work or paint. However, I wanted to put on another coat of clear, so I sanded the existing clear with 1000 grit 3-M paper followed by two more quick coats of clear lacquer. Then, the model sat again for several months: You MUST let lacquer slowly dry and shrink. Otherwise, premature polishing may damage the finish and you’ll end up doing it again.
After waiting for what seemed like an eternity, I sanded the clear with 2000 grit 3-M paper in a mild sudsy water solution, and then polished the finish first with Meguiar’s M-3 followed by Meguiar’s M-7. This procedure is really the only way to correctly polish a delicate lacquer job which doesn’t need more aggressive attention.
Now, it was time to assemble the Crusader. All of the original interior components were carefully cleaned with the product TUFF-STUFF and Q-tips. Though an unbelievable amount of grim was removed, I was astonished to see how beautifully the seats, door panels, and rear cargo area had survived. Somehow, they were in great shape though puckered up from being separated from the body for such a long period of time. My wife, Janet, suggested that I should steam them back into shape so, using her aging steaming iron, I bathed the interior pieces in a hot steam mist and then promptly placed them between two heavy pieces of glass to straighten them. After a short time, they emerged relatively straight. Using some 3-M spray contact cement, those upholstery panels were reinstalled for the first time, perhaps, in three decades.
The assembly was very straightforward. I discovered that some other parts were not present: The rear bumperettes and the components for the floor console and record player (Dennis Doty has just located an original record player in mint condition). The search for those items is ongoing and as soon as they are located, they will be installed. There was one change to the model, necessitated by good taste masquerading as the non-availablility of materials: I have not reinstalled the roof upholstery panels. I always hated them when I was a kid and the fact I have not been able to find the materials meant that I had a good excuse for omitting that awful feature.
The Crusader now sits in the International Model Car Builder’s Museum as the third major model restored under the auspices of the Museum2. A copy of the original Car Model magazine will accompany the model as will a copy of this issue of Model Car Journal. Other models need to be restored, too: As detailed in the accompanying article, the Trustees of the Museum have undertaken two new programs to rescue, acquire and restore (if necessary) key models in the history of our hobby. At the present time, we have several models that await restoration: Jim Keeler’s MCS-XI3 and the Turbine Tub4. We also want to replicate (“clone”) certain other models central to the history of our hobby. Highly-qualified and motivated builders are sought who can help with these important tasks.
All in all, the rescue and restoration of the Crusader marks the return and re-emergence of one of the most important models in the history of our hobby. A special thanks must be extended to Dennis Doty for his generosity in acquiring and then donating the model to the Museum. And without Ed Wright’s wonderful and generous help, the restoration could not have occurred.
Footnotes:
1 Car Model Magazine milked the Crusader project for all it was worth. The following articles appeared in CM:
July-August 1962: “Dress Up Your Dashboard,” pgs. 36-37.
September 1963: “It’s the Crusader in a Campaign for Better Customizing”, pgs 19-20. This was the feature article.
“Build Your Own Crusader – Make Your Next Model Better and Give the Hobby A Boost,” pgs 21-33 This was a remarkably detailed how-to article detailing the various construction steps but did not explicitly deal with the chassis or dash construction.
“Super Detail Your Chassis – Every Added Touch Means Many Additional Points,” pgs. 40-43. This article was pivotal in the history of the hobby: It is the first publishing effort to demonstrate engine wiring and plumbing, and also demonstrated how to run fuel and brake lines. Note the location and nature of the fuel tank. (See reference to the discussion of the August 1964 issue of Car Model Magazine).
“Swinging Doors for Swinging Customs – One and A Halfers Like Those on the Crusader Are Real Pin Ups,” pgs. 55-57. Thisarticle detailed the reshaping and fashioning of the door hinges used on the Crusader.
September 1963: “Custom Headliners for Finer Interiors,” pgs. 14-15. This article demonstrated the construction of the headliner. Interestingly, the article is attributed to Tom McEnteer — a name that showed up on other articles. Could Tom have been the builder?
August 1964: “Detailing Makes the Difference,” by Mike Baltes, pgs. 38-40. This article is interesting because the lead photo shows the Crusader chassis in the background, and it has been modified: The original “Moon”-style gas tank, mounted between the rear frame rails, has been replaced by a flat piece of silver Mylar (or similar material) which survives to this day (review accompanying photos). The reason for the change was clear: The original gas tank interfered with the rear compartment upholstery. The other significant aspect of this is that the body of the Crusader was apparently never meant to be permanently affixed to the frame.
October 1964: “Tips for Builders,” p. 14. This article briefly featured the sectioning work done on the Crusader.
Car Model Custom Annual, Volume 1: “Build Your Crusader,” pgs. 49-61 (And: A high-angle color photo appeared in the center-section portfolio. “Super Detail Your Chassis,” pgs. 16-19.
2 The first two were Jim Keeler’s Dodge Fevers I and II (2). Their story was covered extensively in Scale Auto Enthusiast Number 57 (October 1988). There are other historic models that need to be restored. If you are a highly-qualified and equally motivated modeler, please write to the Museum for further details on this project.
3 Model Car Science magazine, September 1963, pgs 11-15.
4 Rod and Custom February 1962. Model is featured on the color cover and in the one-page feature on page 46, Modelrama: Turbine Tub. Master modeler Jim Keeler’s experiment in designing a way-out Ford phaeton.